
Creating self signed certificates using openssl
In an earlier post, I discussed how makecert.exe tool in Windows OS can be used to create self-signed certificates.

We’ll now check how the popular openssl tool can be used to create these self-signed certificates. One major advantage of this tool is that it is available on all platforms Windows, Linux and OSX.
For the sake of this post, we’ll use the same scenario as in the earlier post, whereby we will generate server/client certificates which is signed by a Root Certificate Authority. Also, we’ll use WSL (Windows Subsystem for Linux) on Windows 10 (specifically ubuntu 18.04) to create these certificates.
We’ll go about this using following steps
- Preparing the directory structure
- Creating a custom Root Certificate
- Creating a server certificate signed by the Root CA
- Packaging the certificate
- Deploying the certificate
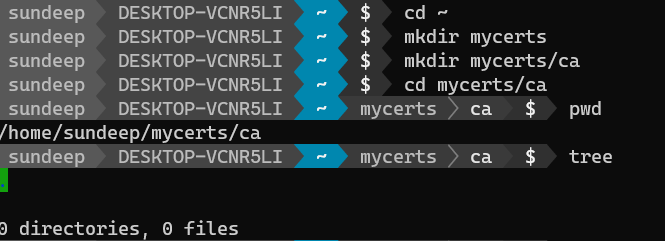
Preparing the directory
Here is how I suggest you create the directory structure.
Choose a directory /home/<user>/mycerts/ca to store all keys and certificates.
You may create it as follows…
Within the ca directory create the following set of directories.
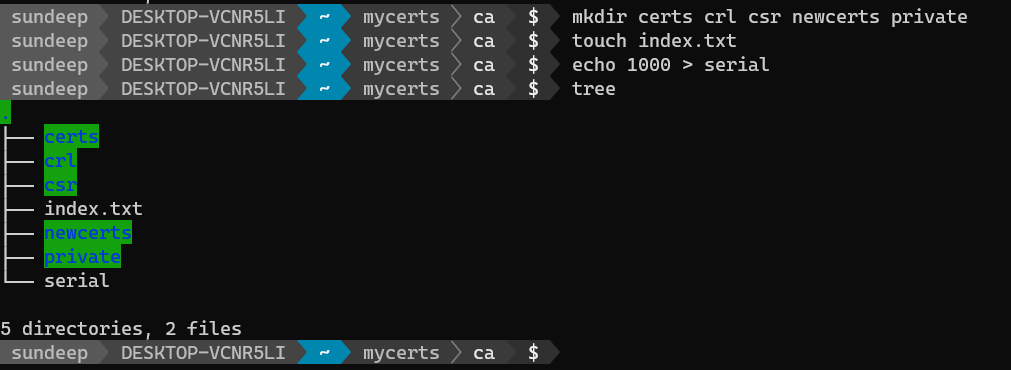
The index.txt and serial files act as a flat file database to keep track of signed certificates.
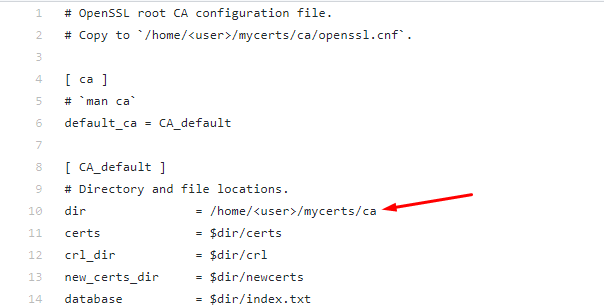
Unlike the makecert.exe that Windows OS provides, openssl does not provide an option to specify all the attributes via command line. It uses a different approach, the one where you create a separate configuration file and provide this configuration file as an input to the openssl tool.
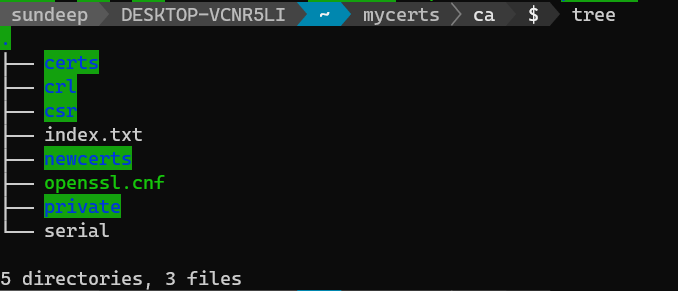
You may download this configuration file openssl.cnf from my github repository here.
Place this file under the ca folder.
Once done, your directory structure would look like …
Open the openssl.cnf file and update the root directory path based of your own user home directory path.
With this, our initial directory structure is ready and we can proceed to the next step of creating the Root CA.
Creating a custom Root Certificate
This can be created in 3 steps.
1. Create the root key
openssl genrsa -aes256 -out private/ca.key.pem 4096When prompted for a passphrase provide the same.

The root key is now stored in the private directory in the file ca.key.pem
Note:
Use 4096 bits for all root certificates.
You’ll still be able to sign server and client certificates of a shorter length.
2. Create the root certificate
We can now create the root certificate ca.cert.pem using the root key ca.key.pem and openssl configuration file openssl.cnf
openssl req -config openssl.cnf \
      -key private/ca.key.pem \
      -new -x509 -days 3650 -sha256 -extensions v3_ca \
      -out certs/ca.cert.pem
Note:
The Root CA validity can be of a longer duration (10 years in this case).
Once the root certificate expires, all certificates signed by the CA become invalid.
When the command is executed, it will ask you for a passphrase and then prod you to specify various details to be incorporated in your certificate request.
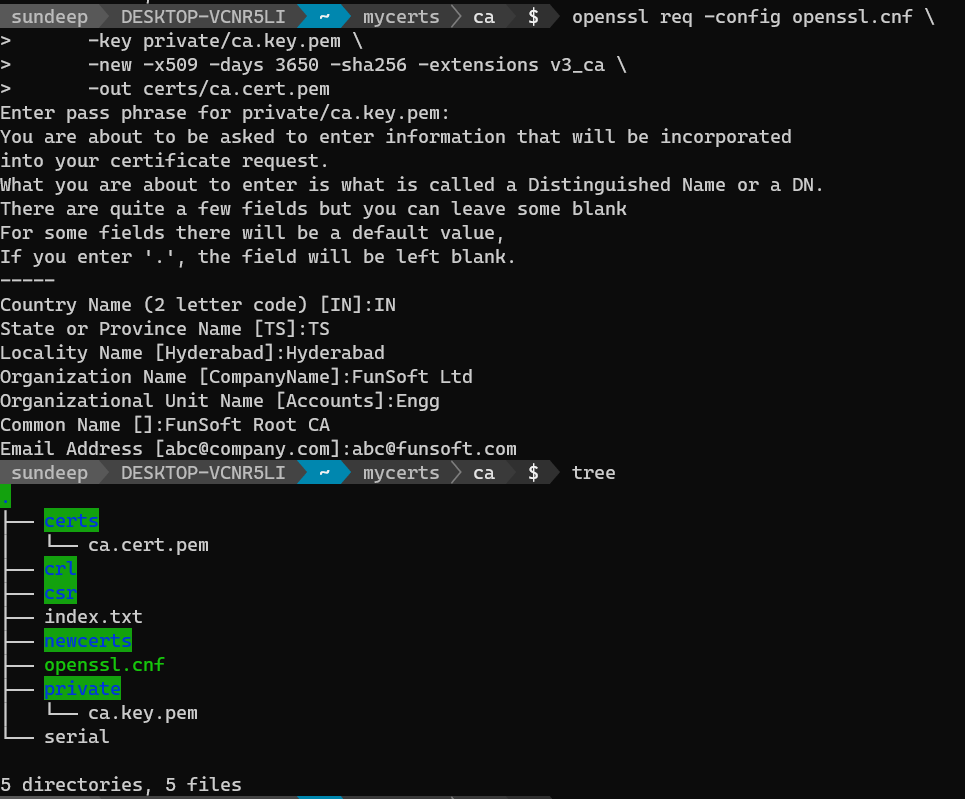
With this our Root CA certificate is now created.
Creating a server certificate signed by the Root CA
This can be performed in 3 steps…
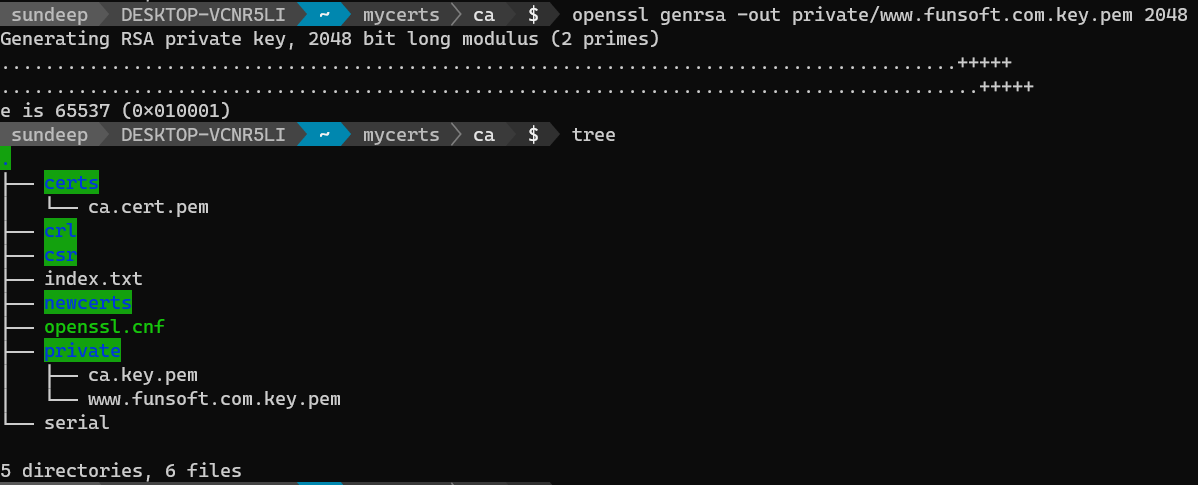
1. Create a key for the server certificate
openssl genrsa -out private/www.funsoft.com.key.pem 2048Note:
Server and client certificates normally expire after one year, so we can safely use 2048 bits instead of 4096 bits used in Root certificates.
2. Create a Certificate Signing Request (CSR)
We will now use the private key created (www.funsoft.com.key.pem), to create a certificate signing request (CSR).
openssl req -config openssl.cnf \
      -key private/www.funsoft.com.key.pem \
      -new -sha256 -out csr/www.funsoft.com.csr.pem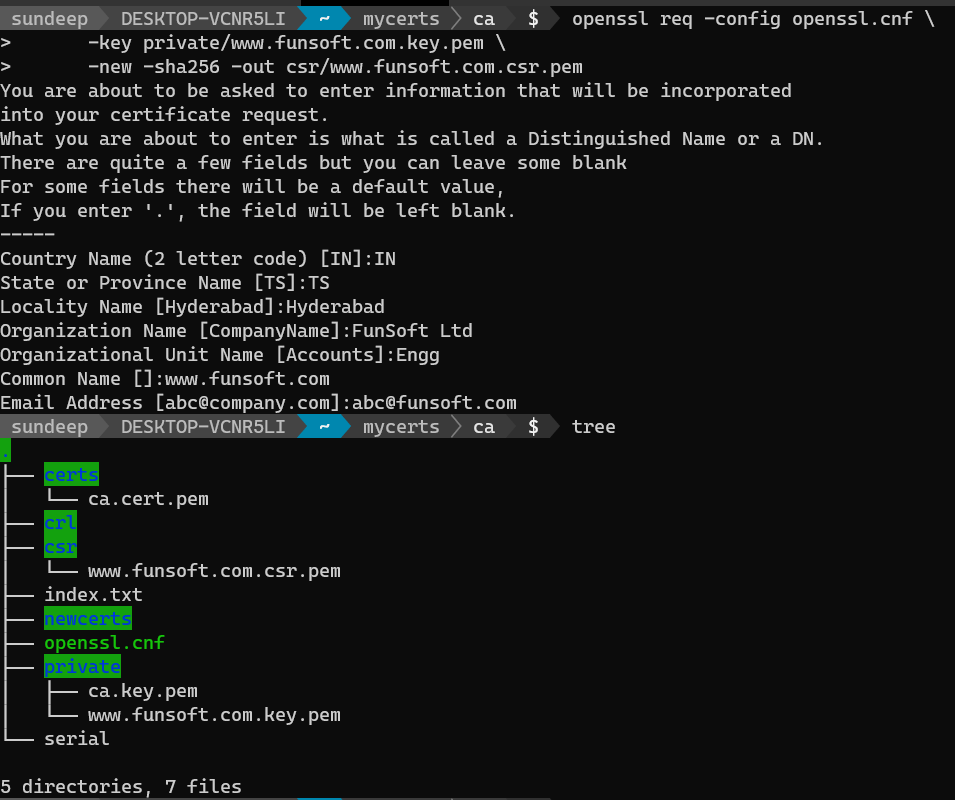
As shown above, provide the certificate details when it prods for it. The Certificate Signing Request (CSR) - www.funsoft.com.csr.pem is generated under the csr folder.
Note:
For server certificates, the Common Name must be a fully qualified domain name (eg, www.funsoft.com), whereas for client certificates it can be any unique identifier (eg, an e-mail address).
3. Create server certificate signed by Root CA
We will now use the Root CA created earlier ca.cert.pem to sign the CSR www.funsoft.com.csr.pem and generate the server certificate www.funsoft.com.cert.pem
openssl ca -config openssl.cnf \
      -extensions server_cert -days 375 -notext -md sha256 \
      -in csr/www.funsoft.com.csr.pem \
      -out certs/www.funsoft.com.cert.pem
When it prods you for passphrase, provide the same. Provide the input y when it asks you to sign the certificate and y again when it asks you to commit the certified requests.
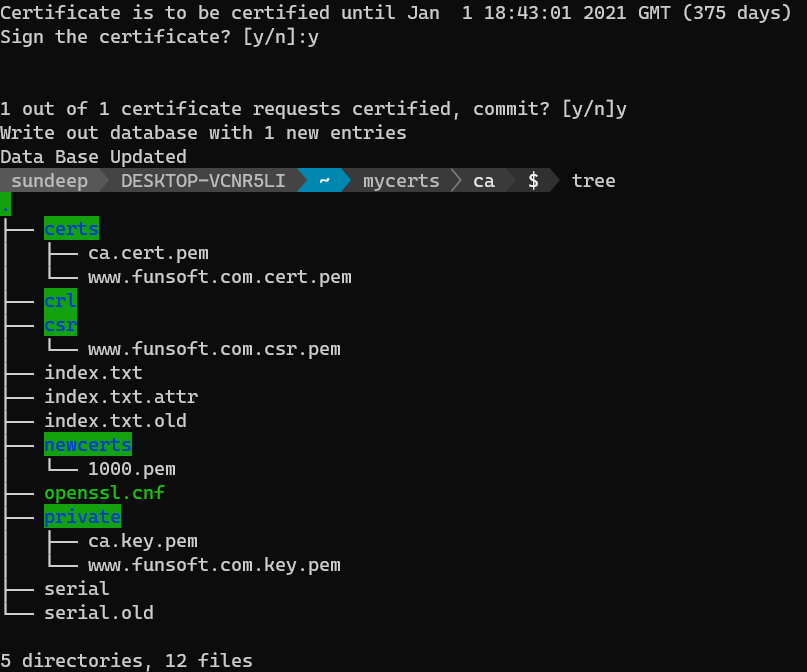
You’ll find the certificate www.funsoft.com.cert.pem created under the certs folder.
Note:
If the certificate is going to be used on a server, use the server_cert extension. If the certificate is going to be used for user authentication (client certificate), use the usr_cert extension.
Packaging the certificate
Now that we have the certificate created, we need to package it appropriately so that it can be deployed easily.
There are many different formats available to package certificates. One of the popular ones is pfx.
openssl pkcs12 -export -out www.funsoft.com.pfx \
        -inkey private/www.funsoft.com.key.pem \
        -in certs/www.funsoft.com.cert.pem \
        -certfile certs/ca.cert.pem
As can be seen in the command above we are packaging the server certificate, its private key and the Root CA used to sign this certificate in a pfx file.
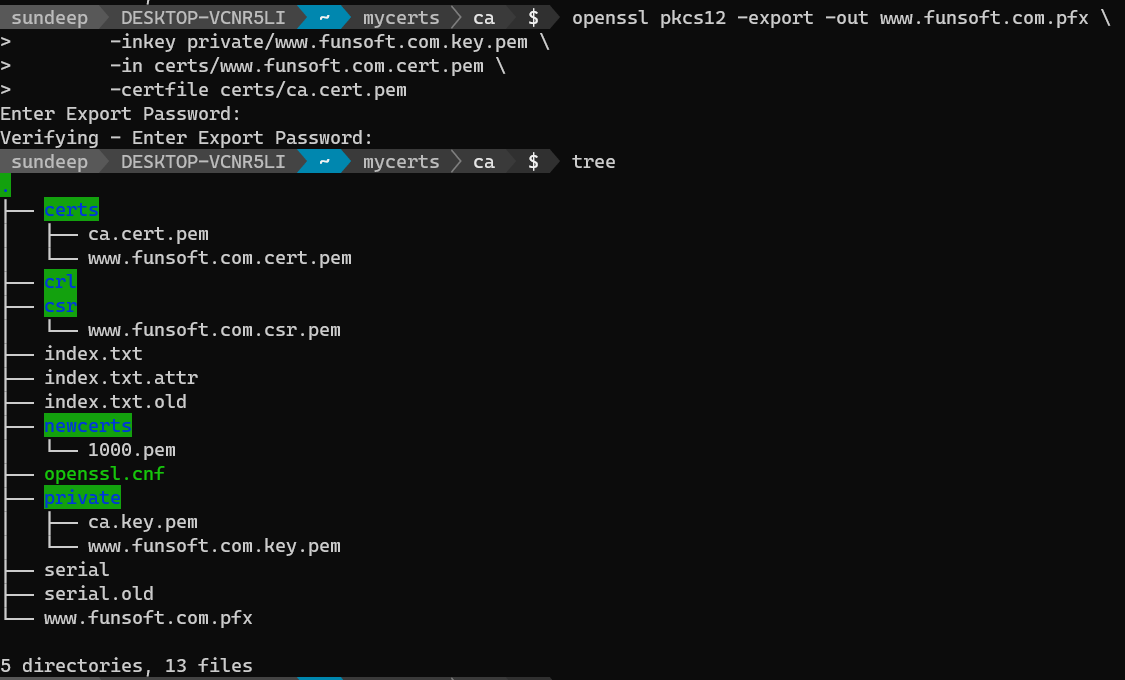
Provide a password, when prodded for it. Later on, while deploying this certificate, you would have to provide this password.
Deploying the certificate
Now that the www.funsoft.com.pfx file is generated, you can double-click on it and follow the wizard to import the Server and Root CA certificates in appropriate stores on Windows OS.
When it asks you to specify a store to store the certificate, choose the Automatically select the certificate store based on the type of certificate option.
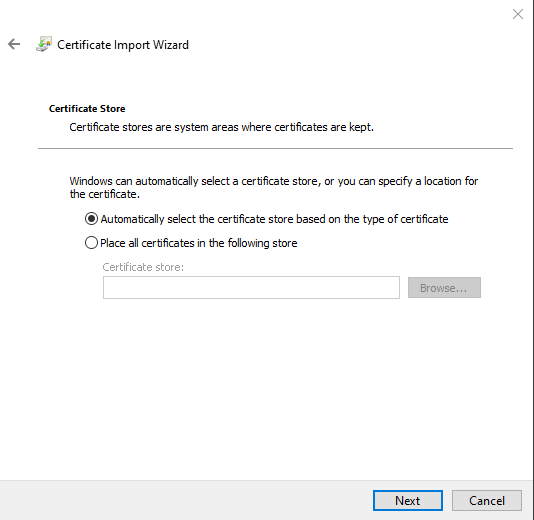
Once the certificate is imported successfully, you’ll find the server certificate with private key installed in the Personal store, while the Root CA imported in the Trusted Root Certification Authorities store.
The server certificate is now available for use with your website.
Hope this was useful!!
Leave a Comment